搜索到
261
篇与
韩小韩
的结果
-
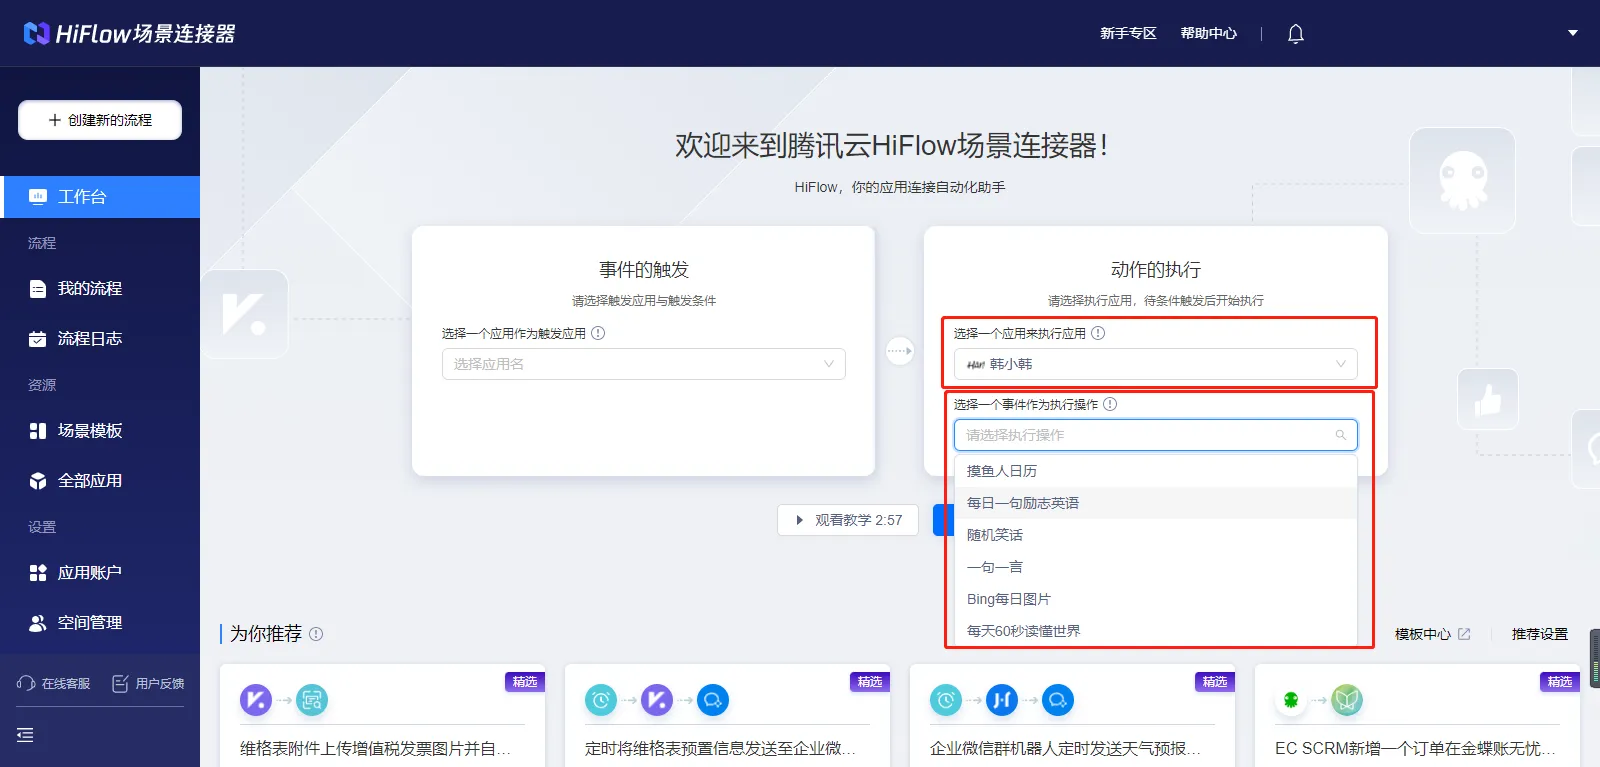
 韩小韩API上架腾讯云HiFlow {callout color="#f0ad4e"}为了庆祝 🎉 韩小韩API的 摸鱼人日历、每日励志英语、随机笑话、今日早报等应用上架腾讯云 HiFlow( hiflow.tencent.com ),做个抽奖吧。国庆第一天从转发的粉丝中抽取两位各送出由 HiFlow 提供的腾讯「盲盒」共2个(见图) 😎{/callout}抽奖规则在最下面!😍 腾讯云HiFlow场景连接器是什么?{abtn icon="fa-link" color="#006eff" href="https://hiflow.tencent.com/" radius="" content="腾讯云HiFLow"/} 腾讯云 HiFlow场景连接器 是一个应用连接器,听上去是不是很复杂?但是简单的来说,可以把很多的应用串起来从而实现自动化。而背后的逻辑就是他底层打通了各个应用之间的API,再提供图形化的界面让用户拖拉拽就可以直接操作。所以过去的API对接或者调用还需要码代码,但是这样让不懂编程的人,也可以轻松调用比如韩小韩的API了。这个应用的逻辑类似早期很火的iFTTT,国内还有一个对标应用Zapier;整体来说,HiFlow应该对标的就是Zapier的方式,流程整体运行的逻辑:触发应用+触发动作:设定触发应用,比如定时、表格等,这样就会去触发下一部动作执行应用+执行动作:比如摸鱼人日历、今日早报定时发到企业微信社群最简单的流程由一个触发事件的触发器(比如定时、摸鱼人日历、今日早报)+一个执行动作的执行器(比如企业微信、钉钉、短信或邮件进行每日推送)组成。比如将摸鱼人日历,添加定时启动对接企业微信,企业微信员工群内每天定时发摸鱼人日历。就是一个最简单的例子。这里,定时启动就是触发条件+触发应用;执行操作就是,摸鱼人日历调用和企业微信群机器人。所以这里也提醒大家一下,韩小韩API是执行应用,因此流程第一个以后的应用才能搜索到。{callout color="#f0ad4e"}和国外的应用相比,HiFlow更好的是,接入了很多国内的应用,比如公众号、企业微信、钉、飞书等。而且也可以通过比如代码coding模块、执行条件、循环执行、webhook等高阶应用来实现更多复杂的应用&操作。和HiFlow的同学聊下来,听说不少腾讯和生态伙伴的应用,都专门为了对接合作,开发了不少新的API,比如腾讯文档,维格表,TAPD等,所以能执行很多好玩的应用连接。对于程序员来说,虽然很多,也能自己写代码,但是比如定时发机器人这种,自己要写几百行代码,还是用这种自动化工具更香啊。{/callout}韩小韩API上架腾讯云HiFlow在 HiFlow 同学们的帮助下,韩小韩API的 摸鱼人日历、每日励志英语、随机笑话、今日早报等应用,之后大家不用自己用webhook和http request自己拼接请求了,直接选择对应的应用就可以,很方便的哦,赶紧去试试吧。比如将摸鱼人日历,添加定时启动对接企业微信,企业微信员工群内每天定时发摸鱼人日历。就是一个最简单的例子。{gird column="2" gap="15"}{gird-item} {/gird-item}{gird-item}{/gird-item}{/gird}{message type="info" content="HiFlow的同学还贴心的为大家准备了一个模版,直接点击就可以:"/}{abtn icon="fa-link" color="#006eff" href="https://hiflow.tencent.com/template/details/1572941151309459457/schedule-vvhan/" radius="" content="摸鱼人日历 腾讯云HiFLow"/}微博抽奖{anote icon="fa-link" href="https://m.weibo.cn/status/4818292302941219?wm=3333_2001&from=10C9393010&sourcetype=weixin" type="success" content="点击前往 微博抽奖"/} {callout color="#f0ad4e"}奖品为腾讯云HiFLow提供 腾讯盲盒*2{/callout}{gird column="2" gap="15"}{gird-item}{/gird-item}{gird-item}{/gird-item}{/gird}
 -
羊了个羊在线刷通关数999999 {callout color="#f0ad4e"}安卓,苹果手机满大街随便下载个抓包软件即可开刷{/callout}直接上图片{gird column="2" gap="15"}{gird-item}{/gird-item}{gird-item}{/gird-item}{/gird}视频教程{dplayer src="https://www.vvhan.com/other/yanglegey/index.m3u8"/}在线网站{abtn icon="fa-link" color="#ff6800" href="https://www.vvhan.com/other/yanglegey/" radius="" content="在线刷羊了个羊通关数"/}
-
斐讯N1盒子刷OpenWrt做主路由/旁路由(详细付配置) {message type="info" content="博主对斐讯的产品非常喜欢喜欢喜欢!路由器这块特别热爱!K2,K2P,K3,N1每个产品手里至少2个!用了块1年的刷了OpenWrt的N1盒子属实很稳!今天升级最新的固件,顺便写篇文章。N1博主刷过电视系统、小钢炮、Armbian、OpenWrt等,折腾来折腾去,发现OpenWrt才是N1最后的归宿,说干就干!"/}准备物件一台电脑一个U盘或硬盘一双小手一个大脑制作N1盒子OpenWrt启动U盘{callout color="#f0ad4e"}关于N1盒子降级,开启adb,第一次刷等问题,百度一下,满大街都是!今天我们从制作OpenWrt启动盘开始{/callout}{gird column="3" gap="15"}{gird-item}{/gird-item}{gird-item}{/gird-item}{gird-item}{/gird-item}{/gird}博主使用的是 balenaEtcher 镜像烧录工具 {cloud title="官网下载" type="default" url="https://www.balena.io/etcher/" password=""/}刷好后,插U盘或硬盘到N1盒子上,启动即可进入OpenWrt电脑WI-FI连接N1盒子#WI-FI名字 Phicomm_n1 #OpenWrt后台默认地址为 192.168.1.1 #账号 root #密码 password{gird column="2" gap="15"}{gird-item}{/gird-item}{gird-item}{/gird-item}{/gird}OpenWrt写入N1盒子的EMMC{callout color="#f0ad4e"}登陆后台后,进入 系统=>TTYD终端{/callout}#账号 root #密码 password{callout color="#f0ad4e"}安装脚本{/callout}./install-to-emmc.sh #斐讯N1盒子 选择 11 #文件格式 ext4{gird column="4" gap="15"}{gird-item}{/gird-item}{gird-item}{/gird-item}{gird-item}{/gird-item}{gird-item}{/gird-item}{/gird}OpenWrt接口配置{callout color="#f0ad4e"}配置LAN口物理设置 取消桥接,选择 WI-FI{/callout}{gird column="2" gap="15"}{gird-item}{/gird-item}{gird-item}{/gird-item}{/gird}{callout color="#f0ad4e"}添加WAN口博主选择DHCP自动获取IP物理设置 选择 以太网适配器 eth0防火墙绑定 wan口{/callout}{gird column="4" gap="15"}{gird-item}{/gird-item}{gird-item}{/gird-item}{gird-item}{/gird-item}{gird-item}{/gird-item}{/gird}{message type="error" content="如果,这样你还不会配置,那你可以用博主备份的配置,一键导入即可!"/}博主配置一键导入{callout color="#f0ad4e"}打开 系统=>备份/升级=>恢复配置=>上传即可{/callout}{gird column="2" gap="15"}{gird-item}{/gird-item}{gird-item}{/gird-item}{/gird}{cloud title="配置文件备份" type="lz" url="https://ohan.lanzouv.com/ihnFc0b27kmd" password=""/}F大fippy的OpenWrt合集{cloud title="F大fippy的OpenWrt合集" type="bd" url="https://pan.baidu.com/s/1BIjHHfi90Oa7Le91Q8gkOg" password="02im"/}
-
最实用的JavaScript一行代码 {message type="info" content="前些年的段子里,总有一些主考官的思想格局打不开,抛出这样的问题:让我在10秒钟内记住你。于是就有了,被打耳光的,被亲的,被扒衣服的,摔手机的······但作为程序员,要怎么用代码震惊的别人呢?Talk is cheap, show me the code!很简单:用简单的逻辑和尽可能少的代码行来解决一个复杂的问题。随着 ES6 箭头函数的引入,可以创建看起来优雅而简单的单行代码。在今天的文章中,我将与你一起来学习 11 个罕见但功能强大的单行代码。现在,准备好,让我们开始吧!"/}文字复制到剪贴板const copyText = async (text) => await navigator.clipboard.writeText(text) copyText('单行代码 前端世界'){callout color="#f0ad4e"}Clipboard API 它的所有操作都是异步的,返回 Promise 对象,不会造成页面卡顿。而且,它可以将任意内容(比如图片)放入剪贴板。{/callout}获取字符串中的字符数const characterCount = (str, char) => str.split(char).length - 1{callout color="#f0ad4e"}获取字符数是一个有用的实用程序,在许多情况下都很有用,我们可以使用它来获取空格数和随后的单词数,或者这可用于获取字符串中某个分隔符的计数。这个想法很简单,我们使用传递的参数 char 拆分字符串并获取返回数组的长度。由于每次将字符串拆分,都会比拆分器多一个;所以减去 1,我们有一个 characterCount 单行。{/callout}检查对象是否为空const isEmpty = obj => Reflect.ownKeys(obj).length === 0 && obj.constructor === Object{callout color="#f0ad4e"}检查对象的空性实际上比看起来要困难得多,即使对象为空,每次检查对象是否等于 {} 也会返回 false。幸运的是,下面的单行代码正是我们想要的。在这一行中,我们检查对象的键长度是否等于 0,以及传递的参数是否为实际对象。{/callout}等待一段时间再执行const wait = async (milliseconds) => new Promise((resolve) => setTimeout(resolve, milliseconds));{callout color="#f0ad4e"}在这一行中,我们将通过一些异步编程来弄脏我们的代码。这个想法很简单,在运行代码时,如果你想等待一定的时间,这里是等待单行在等待单行中,我们创建一个承诺并在给定的时间后使用 setTimeout 函数解决它。{/callout}获取两个日期之间的日差const daysBetween = (date1, date2) => Math.ceil(Math.abs(date1 - date2) / (1000 * 60 * 60 * 24)){callout color="#f0ad4e"}在开发 Web 应用程序时,日期通常是实现起来最令人困惑的部分,因为有许多概念很容易被误算。这是一个强大的单线计算两个日期之间的天差。但还有更多事情要做,正如我所做的那样,你可以创建自己的单线来计算月、年差异等。这种单线背后的逻辑很容易理解。当两个日期相减时,返回值是以毫秒为单位的差值,要将毫秒转换为天,我们必须将其除以毫秒、秒、分钟和小时。{/callout}检查设备上的触摸支持const touchSupported = () => ('ontouchstart' in window || DocumentTouch && document instanceof DocumentTouch){callout color="#f0ad4e"}随着可以连接到互联网的设备越来越多,创建响应式网站的必要性也在增加。20 年前,开发者应该考虑网站的桌面版本,但今天超过 50% 的网络流量来自触摸移动设备。因此,基于设备的触控支持采取一些行动是一个非常重要的概念。在这一行中,我们正在检查文档是否支持 touchstart 事件。{/callout}在元素后插入 HTML 字符串const insertHTMLAfter = (html, el) => el.insertAdjacentHTML('afterend', html){callout color="#f0ad4e"}开发 Web 应用程序时,使用 JavaScript 更新 DOM 是一件很常见的事情。有一些基本的方法可以完成工作,但是,当情况变得复杂时,就很难克服。这是一个在 HTML 元素之后立即注入 HTML 字符串的单行代码。经过几分钟的思考和谷歌搜索,我相信你可以找到这个单线的以前版本。{/callout}随机排列数组const shuffle = arr => arr.sort(() => 0.5 - Math.random()){callout color="#f0ad4e"}在开发中打乱一组数据是一个常见的情况,你可以随时遇到,不幸的是,JavaScript 中没有内置数组的 shuffle 方法。但是,这里有一个你可以每天使用的 shuffle one-liner它利用数组的排序方法,在数组的前一个元素之前或之后随机排序。{/callout}获取随机布尔值const getRandomBoolean = () => Math.random() >= 0.5{callout color="#f0ad4e"}在开发时,尤其是在写游戏代码时,有时,我们会想随机采取行动。在这些情况下,下面的单行代码非常方便。上面的单行代码有 50/50 的机会返回真或假。因为生成的随机数大于0.5的概率等于变小的概率。然而,例如,如果你想得到一个概率为 70% 的随机布尔值,那么你可以简单地将 0.5 更改为 0.7 等等。{/callout}计算数组的平均值const average = (arr) => arr.reduce((a, b) => a + b) / arr.length{callout color="#f0ad4e"}可以使用多种方法计算数组的平均值。但逻辑对所有人都是一样的,我们必须得到数组及其长度的总和;然后,通过除法给出平均值。在平均单行中,我们使用 reduce 来获取一行中数组的总和,而不是使用循环。然后,我们将它除以数组长度,这是一个数组的平均值。{/callout}查询某天是否为工作日const isWeekday = (date) => date.getDay() % 6 !== 0; isWeekday(new Date(2023, 02, 01)) // true{callout color="#f0ad4e"}我们自己写日历组件时经常会用到,判断某个日期是否为工作日;周一至周五为工作日:{/callout}转换华氏/摄氏// 将华氏温度转换为摄氏温度 const fahrenheitToCelsius = (fahrenheit) => (fahrenheit - 32) * 5/9; fahrenheitToCelsius(50); // 10 // 将摄氏温度转华氏温度 const celsiusToFahrenheit = (celsius) => celsius * 9/5 + 32; celsiusToFahrenheit(100) // 212{callout color="#f0ad4e"}处理温度有时会晕头转向。这两个函数则能帮助大家将华氏温度转换为摄氏温度,以及将摄氏温度转换为华氏温度。{/callout}每隔4个空1格美团卷码[..."088896520132"].reduce((res, itm, idx) => (res += idx % 4 === 1 ? `${itm} `: itm),''); // 08 8896 5201 32检查当前选项卡是否在后台const isTabActive = () => !document.hidden; isTabActive() // true|false检查设备类型const judgeDeviceType = () => /Android|webOS|iPhone|iPad|iPod|BlackBerry|IEMobile|OperaMini/i.test(navigator.userAgent) ? 'Mobile' : 'PC'; judgeDeviceType() // PC | Mobile{message type="info" content="END"/}
-
Adobe After Effects 2022 最新免激活版 软件介绍Adobe After Effects(简称AE)是一款专业的图形视频处理软件,数字影视特效合成软件,视频后期特效制作软件。主要用来创建动态图形和视觉特效,支持2D以及3D,是基于非线性编辑的软件,透过图层控制音频与影片的合成,能够透过有选择性地隐藏图层或分组来管理有点杂乱的轨道。After Effects 软件适用于从事设计和视频特技的机构,包括电视台、动画制作公司、个人后期制作工作室以及多媒体工作室。软件截图{gird column="2" gap="15"}{gird-item}{/gird-item}{gird-item}{/gird-item}{/gird}更新摘要Adobe After Effects 2022 正式版2022年5月版(22.4)helpx.adobe.com/cn/after-effects/kb/fixed-issues.html新增功能摘要helpx.adobe.com/cn/after-effects/using/whats-new.html版本特点by vposy采用官方版本改装而成,免激活,多语言完整版;免登陆无需断网安装,支持自定义更改安装位置;移除创意云文档和库联网支持,所有功能完全本地化;系统要求AE2021:DirectX 12 and Windows 10 2004 及更高版64位AE2020:DirectX 12 and Windows 10 1809 及更高版64位AE2019:DirectX 12 and Windows 10 及更高版64位AE2018:DirectX 9 and Windows 7及更高版64位下载地址{cloud title="Adobe_After_Effects_2022_22.4.0.56_ACR14.4_SP_20220610" type="default" url="https://store.vvhan.com/d/Onedrive/Soft/Windows/Adobe%20After%20Effects%202022%20SP/Adobe_After_Effects_2022_22.4.0.56_ACR14.4_SP_20220610.zip" password=""/}{cloud title="Adobe_After_Effects_2022_22.3.0.107_ACR14.3_SP_20220415" type="default" url="https://store.vvhan.com/d/Onedrive/Soft/Windows/Adobe%20After%20Effects%202022%20SP/Adobe_After_Effects_2022_22.3.0.107_ACR14.3_SP_20220415.zip" password=""/}{cloud title="Adobe_After_Effects_2022_22.2.0.120_ACR14.2_SP_20220208" type="default" url="https://store.vvhan.com/d/Onedrive/Soft/Windows/Adobe%20After%20Effects%202022%20SP/Adobe_After_Effects_2022_22.2.0.120_ACR14.2_SP_20220208.zip" password=""/}{cloud title="Adobe_After_Effects_2022_22.0.1.2_ACR14.0_SP_20211111" type="default" url="https://store.vvhan.com/d/Onedrive/Soft/Windows/Adobe%20After%20Effects%202022%20SP/Adobe_After_Effects_2022_22.0.1.2_ACR14.0_SP_20211111.zip" password=""/}
-
分享我喜欢的风景图~ 我很喜欢海,十一去看海~{gird column="3" gap="15"}{gird-item}{/gird-item}{gird-item}{/gird-item}{gird-item}{/gird-item}{/gird}{gird column="3" gap="15"}{gird-item}{/gird-item}{gird-item}{/gird-item}{gird-item}{/gird-item}{/gird}{gird column="3" gap="15"}{gird-item}{/gird-item}{gird-item}{/gird-item}{gird-item}{/gird-item}{/gird}{dplayer src="https://jsd.onmicrosoft.cn/gh/uxiaohan/uxiaohan.github.io@master/v2/2022/08/hai1.m3u8"/}{dplayer src="https://jsd.onmicrosoft.cn/gh/uxiaohan/uxiaohan.github.io@master/v2/2022/08/hai2.m3u8"/}
-
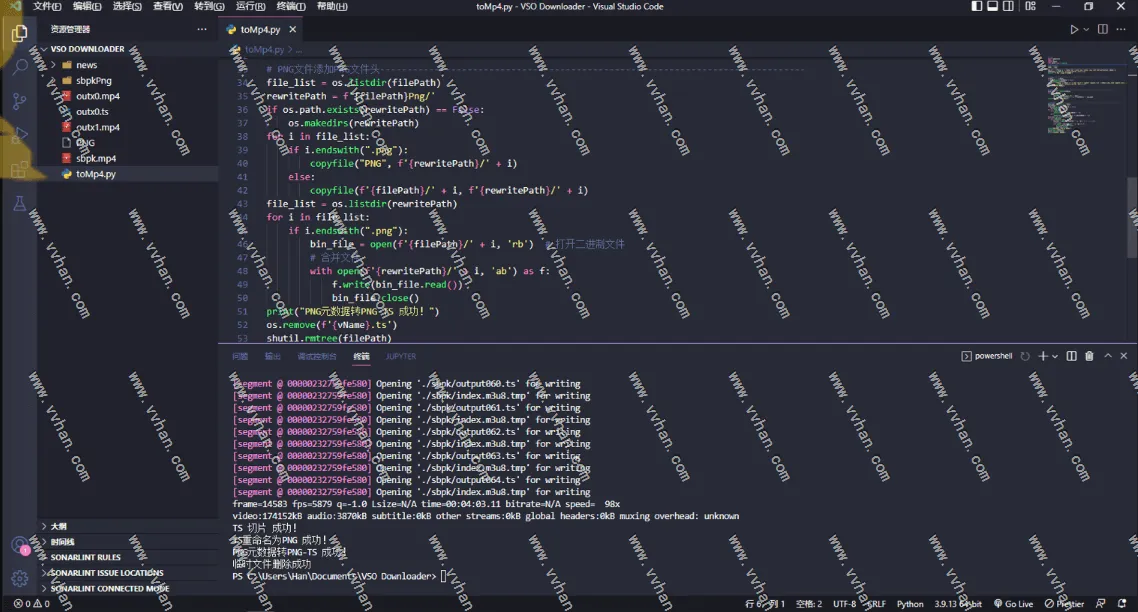
FFMPEG视频切片TS文件添加PNG文件头伪图片上传 {message type="info" content="在这个图床泛滥的时代,不能白白浪费那么那么那么多免费的图床!总想着做点什么,想来想去,只想把我好多好多无处可放的视频传上去,可是图床它并不能上传视频。思来想去,图床只能上传图片嘛?为什么它知道我是图片?我想!并不是!看来看去,噢,原来只要把文件头改成图片HEAD头就OK,我说它是图片它就是图片!图片改头换面伪装大法现在开始~"/}前期准备{callout color="#f0ad4e"}FFmpeg 并配置环境变量(不会的话百度一下 你知道~){/callout}{cloud title="FFmpeg 官网下载" type="default" url="https://www.gyan.dev/ffmpeg/builds/" password=""/}{callout color="#f0ad4e"}python 环境 (自行安装,不会的话,百度一下噢~){/callout}{cloud title="Python 官网下载" type="default" url="https://www.python.org/downloads/" password=""/}整体步奏对MP4视频文件转换单TS文件对单TS文件切割成多个TS切片文件并生成M3U8文件对TS文件进行 "偷天换日 改头换面" 伪图片处理上传任意图床取 "PNG" 文件地址最后预览视频{callout color="#f0ad4e"}国外图床 测试可正常播放(视频质量过高,且国外CDN,速度加载较慢,国内图床无敌!){/callout}{dplayer src="https://jsd.onmicrosoft.cn/gh/uxiaohan/uxiaohan.github.io@master/v2/2022/08/index.m3u8"/}开始 Start{callout color="#f0ad4e"}Python 脚本博主已经写好,一键处理,方便至简!!!!{/callout}代码片段{callout color="#f0ad4e"}标准mp4视频转TS文件{/callout}# Mp4 文件名字 不需要加 .mp4 后缀 vName = 'SaiBoPengKe' cmd_str = f'ffmpeg -y -i {vName}.mp4 -vcodec copy -acodec copy -vbsf h264_mp4toannexb {vName}.ts' subprocess.run(cmd_str, encoding="utf-8", shell=True) print(f'标准 Mp4 转换到 TS 成功!'){callout color="#f0ad4e"}TS单文件切片{/callout}filePath = f'./{vName}' if os.path.exists(filePath) == False: os.makedirs(filePath) cmd_str = f'ffmpeg -i {vName}.ts -c copy -map 0 -f segment -segment_list ./{vName}/index.m3u8 -segment_time 2 ./{vName}/output%03d.ts' subprocess.run(cmd_str, encoding="utf-8", shell=True) print(f'TS 切片 成功!'){callout color="#f0ad4e"}TS切片文件批量重命名为PNG{/callout}file_list = os.listdir(filePath) for i in file_list: if i.endswith(".ts"): new_name = i.replace(".ts", ".png") os.rename(f'{filePath}/' + i, f'{filePath}/' + new_name) print("TS重命名为PNG 成功!"){callout color="#f0ad4e"}TS切片 偷天换日 改头换面 添加PNG文件头{/callout}file_list = os.listdir(filePath) rewritePath = f'{filePath}Png/' if os.path.exists(rewritePath) == False: os.makedirs(rewritePath) for i in file_list: if i.endswith(".png"): copyfile("PNG", f'{rewritePath}/' + i) else: copyfile(f'{filePath}/' + i, f'{rewritePath}/' + i) file_list = os.listdir(rewritePath) for i in file_list: if i.endswith(".png"): bin_file = open(f'{filePath}/' + i, 'rb') # 打开二进制文件 # 合并文件 with open(f'{rewritePath}/' + i, 'ab') as f: f.write(bin_file.read()) bin_file.close() print("PNG元数据转PNG-TS 成功!") os.remove(f'{vName}.ts') shutil.rmtree(filePath) print("临时文件删除成功"){callout color="#f0ad4e"}这里需要一个 PNG 文件头,可自己自定义,上传后伪图片文件可显示博主提供一个做好的{/callout}{callout color="#f0ad4e"}PNG头部HEAD数据16进制{/callout}89504E470D0A1A0A0000000D494844520000007C0000007508060000008C118576000000017352474200AECE1CE90000000467414D410000B18F0BFC6105000000097048597300000EC300000EC301C76FA8640000011049444154785EEDD10101000008C320FB97BE411815B8855238A6704CE198C23185630AC7148E29{cloud title="PNG头文件下载" type="lz" url="https://ohan.lanzouv.com/i4PL80a5vgoh" password=""/}代码整合脚本# utf-8 import subprocess import os import shutil from shutil import copyfile # Mp4 文件名字 vName = 'sbpk' # 标准mp4转TS格式------------------------------------------------------------------------------ cmd_str = f'ffmpeg -y -i {vName}.mp4 -vcodec copy -acodec copy -vbsf h264_mp4toannexb {vName}.ts' subprocess.run(cmd_str, encoding="utf-8", shell=True) print(f'标准 Mp4 转换到 TS 成功!') # TS切片------------------------------------------------------------------------------ filePath = f'./{vName}' if os.path.exists(filePath) == False: os.makedirs(filePath) cmd_str = f'ffmpeg -i {vName}.ts -c copy -map 0 -f segment -segment_list ./{vName}/index.m3u8 -segment_time 2 ./{vName}/output%03d.ts' subprocess.run(cmd_str, encoding="utf-8", shell=True) print(f'TS 切片 成功!') # TS重命名为PNG------------------------------------------------------------------------------ file_list = os.listdir(filePath) for i in file_list: if i.endswith(".ts"): new_name = i.replace(".ts", ".png") os.rename(f'{filePath}/' + i, f'{filePath}/' + new_name) print("TS重命名为PNG 成功!") # PNG文件添加PNG文件头------------------------------------------------------------------------------ file_list = os.listdir(filePath) rewritePath = f'{filePath}Png/' if os.path.exists(rewritePath) == False: os.makedirs(rewritePath) for i in file_list: if i.endswith(".png"): copyfile("PNG", f'{rewritePath}/' + i) else: copyfile(f'{filePath}/' + i, f'{rewritePath}/' + i) file_list = os.listdir(rewritePath) for i in file_list: if i.endswith(".png"): bin_file = open(f'{filePath}/' + i, 'rb') # 打开二进制文件 # 合并文件 with open(f'{rewritePath}/' + i, 'ab') as f: f.write(bin_file.read()) bin_file.close() print("PNG元数据转PNG-TS 成功!") os.remove(f'{vName}.ts') shutil.rmtree(filePath) print("临时文件删除成功"){message type="info" content="我刚测试成功,立马发文,快去试试吧~"/}
-
微信小程序调用摄像头实现拍照功能 WXML文件代码<view class="content"> <view class="camera-con"> <camera wx:if="{{cameraStatus}}" device-position="back" flash="off" binderror="error"></camera> <van-image wx:if="{{!cameraStatus}}" width="100%" height="auto" src="{{src}}" fit="fill" /> </view> <view class="btn-con"> <van-button round color="#999999" size="small" bindtap="rePhoto">重新拍照</van-button> <van-button class="take" icon="stop-circle-o" color="rgba(0,0,0,0)" bindtap="takePhoto"></van-button> <van-button round color="#999999" size="small" bindtap="sendPhoto">提交图片</van-button> </view> </view>JS文件代码Page({ data: { cameraStatus: false, src: '', }, onLoad() { const _this = this wx.getSetting({ success: res => { if (res.authSetting['scope.camera']) { _this.setData({ cameraStatus: true }) } else { // 用户还没有授权,向用户发起授权请求 wx.authorize({ scope: 'scope.camera', success() { // 用户同意授权 _this.setData({ cameraStatus: true }) }, fail() { // 用户不同意授权 _this.openSetting().then(res => { _this.setData({ cameraStatus: true }) }) } }) } }, fail: res => { console.log('获取用户授权信息失败') } }) }, // 打开授权设置界面 openSetting() { const _this = this let promise = new Promise((resolve, reject) => { wx.showModal({ title: '授权', content: '请先授权获取摄像头权限', success(res) { if (res.confirm) { wx.openSetting({ success(res) { if (res.authSetting['scope.camera']) { // 用户打开了授权开关 resolve(true) } else { // 用户没有打开授权开关, 继续打开设置页面 _this.openSetting().then(res => { resolve(true) }) } }, fail(res) { console.log(res) } }) } else if (res.cancel) { _this.openSetting().then(res => { resolve(true) }) } } }) }) return promise; }, // 拍照 takePhoto() { const ctx = wx.createCameraContext() ctx.takePhoto({ quality: 'high', success: (res) => { this.setData({ src: res.tempImagePath, cameraStatus: false }) } }) }, // 重新拍照 rePhoto() { this.setData({ cameraStatus: true, src: '' }) } })WXSS文件代码.content { padding: 0; margin: 0; position: fixed; width: 100%; display: flex; flex-direction: column; box-sizing: border-box; justify-content: space-between; overflow: hidden; height: 100vh; } image { margin: 0; padding: 0; } .content .camera-con { flex: 1; overflow: hidden; } .content .camera-con image, .content .camera-con camera { width: 100%; height: calc(100vh - 148rpx); } .content .btn-con { display: flex; justify-content: space-between; align-items: center; height: 148rpx; background-color: #333333; } .content .btn-con button { margin: 0 30rpx; } .content .btn-con .take { border: 2rpx solid #FFFFFF; border-radius: 50%; height: 93rpx; width: 93rpx; display: flex; align-items: center; justify-content: center; }